The WACS database does of course carry far more information about
the model than just her name and icons, so for the next step we're going
to look at adding a few basic pieces of information about her to each
entry. The first step is to add some additional fields to the list of
what we want returned by the SQL query. Initially we're going to add
another five fields: they are mhair, mlength, mtitsize, mnsets
and mnvideos. These database fields give
us her hair colour, length, the size of her breasts and the number of
images sets and videos we have by her respectively. The modified version
of the query looks like:
Example 3.2. Modified SQL command for more Model Info
// do db select
//                0      1        2          3       4
$query = "select mname, modelno, mbigimage, mimage, mhair, ".
//                5        6         7       8
         "       mlength, mtitsize, mnsets, mnvideos from ".
         $wacs->conf_get_attr("tables","models").
         " where mflag = 'S' order by mname");
$cursor = $dbhandle->prepare( $query );
$cursor->execute();
in php.
![[Note]](images/note.png) | Note |
|---|---|
We've added a second line of comments with the element numbers within the array that the returned database field will appear in; mlength will be index 5 for instance. |
The same code in perl will look like:
# do db select
#                 0      1        2          3       4
$query = "select mname, modelno, mbigimage, mimage, mhair, ".
#                 5        6         7       8
         "       mlength, mtitsize, mnsets, mnvideos from ".
          conf_get_attr("tables","models").
          " where mflag = 'S' order by mname";
$cursor = $dbhandle->prepare( $query );
$cursor->execute;
The next step is to modify the display loop to include the extra details and in this case it probably makes sense to switch to using an HTML table cell to contain and manage the entry. We'll start off by simply re-writing the existing display loop to build the results into an HTML table instead - once we have that working, we'll restyle the table to include the extra fields we just added to the query. There is no actual requirement to make use of all the fields we've requested.
Lets have a look at the structure of the HTML document we're outputing here: First we need to open the new table, then each model will have her own row as we go through with the headshot image on the left and her name on the right, and finally we'll finish off the table. The HTML (minus the links) to do this will look something like:
<table>
 <tr>
  <td><img src="modicons/KazB-1.jpg" alt="[Kaz B]"></td>
  <th>Kaz B</th>
 </tr>
 <tr>
  <td><img src="modicons/Roxanne-1.jpg" alt="[Roxanne]"></td>
  <th>Roxanne</th>
 </tr>
 <tr>
  <td><img src="modicons/Sabrina-1.jpg" alt="[Sabrina]"></td>
  <th>Sabrina</th>
 </tr>
</table>
Of course the next step is to re-write the code to actually recreate
the necessary HTML; the start and end of the table simply replace the
unordered list (<ul> and </ul>
) tags outside the loop that iterates through the list of models
returned by the database. The list element (<li>
and </li>) tags get replaced by the row start
and end tags (<tr> and </tr>.
Since we're puting the headshot icon and the name in separate elements and
want a link to the appropriate model page on both of them, we need to double
up the code that creates the hypertext link to wacsmpthumbs. We then include
the icon (with alignment attributes) in a standard table tag (
<td> and the name in a heading (<th>)
table tag so it comes out in bold and is centred.
The mysimple example thus re-writen will look like:
Example 3.3. New version of the loop using tables
// output the results
print "<table>\n";
while( $results = $cursor->fetch(PDO::FETCH_NUM) )
{
        // start the HTML table row
        print "<tr><td valign=top align=center>\n";
        // link around the headshot image
        print "<a href=\"".$wacs->conf_get_attr("server","cgiurl");
        print "wacsmpthumbs/".$results[1]."\">";
        // head shot image
        print "<img src=\"".$wacs->conf_get_attr("server","siteurl");
        print "modicons/".$results[3]."\"[".$results[0]."]\"></a>\n";
        // end this cell and start the next
        print "</td><th>\n";
        // link around name
        print "<a href=\"".$wacs->conf_get_attr("server","cgiurl");
        print "wacsmpthumbs/".$results[1]."\">";
        // the name
        print $results[0]."</a>\n";
        // end the HTML table row
        print "</th></tr>\n";
}
print "</table>\n";
// finish off
and re-writing the same function in perl gives us something like:
# output the results
print "<table>\n";
while( @results = $cursor->fetchrow_array )
{
        # start the HTML table row
        print "<tr><td valign=top align=center>\n";
        # link around the headshot image
        print "<a href=\"".conf_get_attr("server","cgiurl");
        print "wacsmpthumbs/".$results[1]."\">";
        # head shot image
        print "<img src=\"".conf_get_attr("server","siteurl");
        print "modicons/".$results[3]."\"[".$results[0]."]\"></a>\n";
        # end this cell and start the next
        print "</td><th>\n";
        # link around name
        print "<a href=\"".conf_get_attr("server","cgiurl");
        print "wacsmpthumbs/".$results[1]."\">";
        # the name
        print $results[0]."</a>\n";
        # end the HTML table row
        print "</th></tr>\n";
}
print "</table>\n";
# finish off
When run, this modified version of the script should produce the following:

As you can see, this has improved the layout somewhat over the
previous version using just unordered list elements. These days we would
probably actually use an extensive structure of div
elements to identify the various parts and then style and lay them out using
the CSS (Cascading Style Sheets) file. Although old, the tables mechanism is
a much simpler way to start out with laying out data.
Now to add those extra fields....
To display some more details about the model, we're going to span
the headshot on the left hand side over several rows, and add the model
details themselves as additional table rows on the right hand side. Our
first change therefore is to add rowspan=4 to the
options on the image container <td> tag. The
resulting php code is:
        // start the HTML table row
        print "<tr><td rowspan=4 valign=top align=center>\n";
        // link around the headshot image
and in perl reads:
        # start the HTML table row
        print "<tr><td rowspan=4 valign=top align=center>\n";
        # link around the headshot image
Next we add the second row which will include her hair colour and length, then a third row which will describe her breast size and the fourth row that gives the number of image sets and the number of videos we have for her.
Example 3.4. Adding Model Information
        // end the HTML table row
        print "</th></tr>\n";
        // do the second row (her hair)
        print "<tr><td>hair: ";
        print $results[5]." ".$results[4];
        print "</td></tr>\n";
        // do the third row (her breasts)
        print "<tr><td>breasts: ";
        print $results[6]."\n";
        print "</td></tr>\n";
        // do the fourth row (her sets)
        print "<tr><td>sets: ";
        print $results[7];
        if( $results[8] > 0 )
        {
                print " videos: ".$results[8];
        }
        print "</td></tr>\n";
and the same implemented in perl would look like:
        # end the HTML table row
        print "</th></tr>\n";
        # do the second row (her hair)
        print "<tr><td>hair: ";
        print $results[5]." ".$results[4];
        print "</td></tr>\n";
        # do the third row (her breasts)
        print "<tr><td>breasts: ";
        print $results[6]."\n";
        print "</td></tr>\n";
        # do the fourth row (her sets)
        print "<tr><td>sets: ";
        print $results[7];
        if( $results[8] > 0 )
        {
                print " videos: ".$results[8];
        }
        print "</td></tr>\n";
}
With these changes made, if you now run this version of the program,
which is called mysimple4 in the samples/programming
directory, you should see something like this:
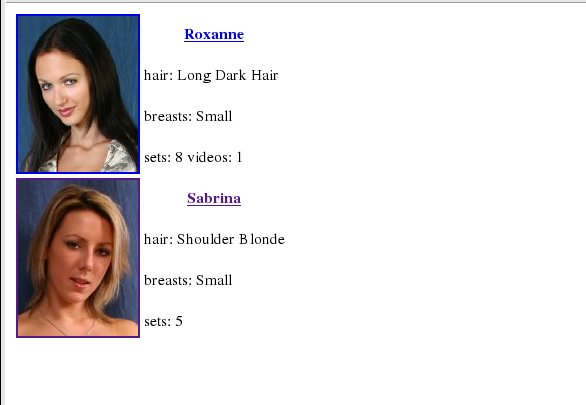
There's obviously a lot more room for using many more of the fields within the model schema for further improvement of our model index, and we'll return to this subject in a later chapter (Chapter 6, The User Interface Toolkit). Before we leave the topic of models and move on to sets, we will cover just one more topic, that of adding rating icons.