Table of Contents
As the old adage goes, Size Matters - this is particularly true with WACS! Often the images from high quality adult web sites are fairly large and of high resolution; while this is fine on a high performance desktop PC with a big screen or when printed out, it can actually be a bit of a pain when working on a smaller screen such as on a laptop PC. If the image is too large, you'll only get to see the top part of each image when browsing through a collection or watching a slide show. Even if you can get your web browser to scale the image, you're still downloading more data than you need to.
WACS has extensive facilities for improving things visually by reducing the size of each image before it sends it to you such that you get to see the whole image. You can select what size best suits your laptop (or other display device) by using the preferences system.
 |
The Preferences Screen
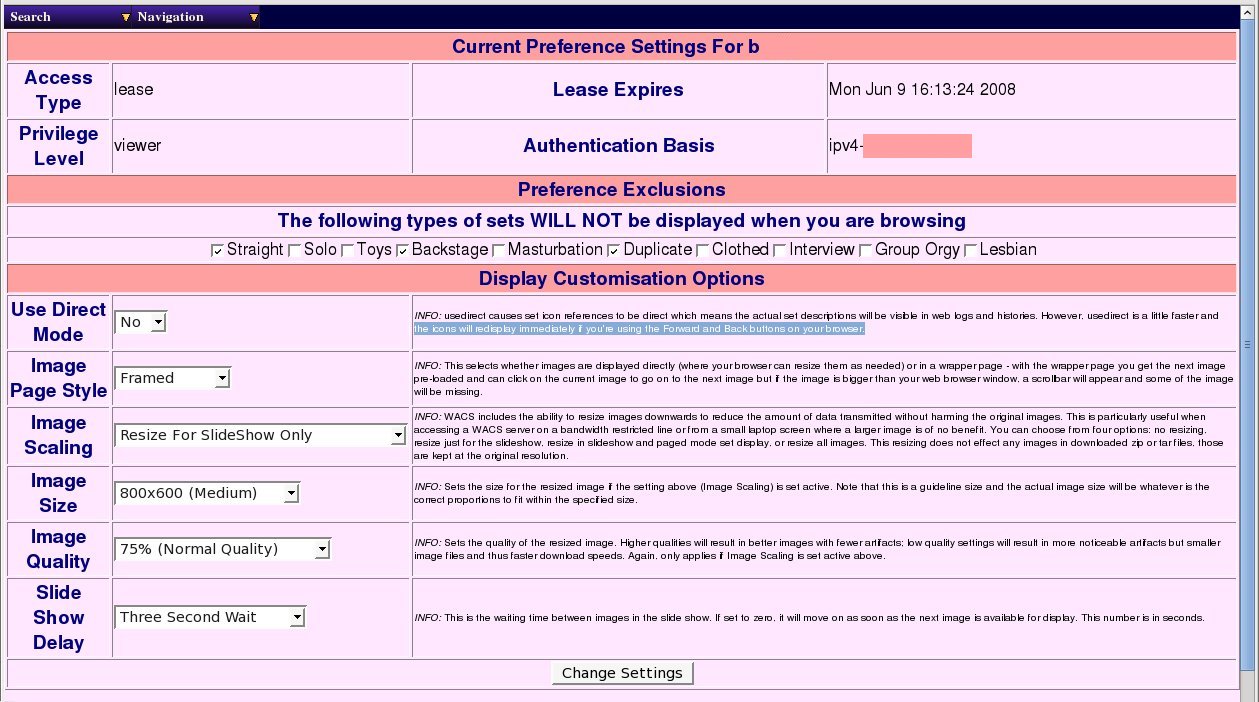
The top bit of the preferences screen gives you information on what account you're signed on with, how you're getting access (permanent permissions or temporary lease), your current priviledge level and when your lease (if you're gaining access through a lease) expires. The next section covers the preference exclusions (any types of set you don't want to be shown) you set at the start of this session. You can edit and revise these using the tick-boxes here. Note that the changes do not take effect until you click on the Change Settings button.
The third section is the most complicated and this controls how WACS communicates with you. The first option titled Use Direct, allows you to specify whether you want WACS to obscure the names of the icons it uses. It's normal action is to do so, but not doing so can make a page a little faster to load, particularly if it contains a lot of thumbnails. The WACS site manager also has to enable this option in order for it to work.
The next option, Image Page Style, sets whether the images WACS presents when you click on a thumbnail in the set page or set index are surrounded by navigation buttons or not. If you choose to take the framed images, the web browser typically doesn't apply any scaling and so the image may be too big for your screen and gain a scroll bar. However the frame preloads the next image and makes it easy to move on to it by just clicking on the current image. The image should then load instantly as it should already be cached. If you choose not to add frames, you get none of the preload or navigation benefits, but your web browser may well be able to scale the image for you.
We'll return to the next three options; image size, image scaling and image quality in a moment. The final option in the preferences editor is to select the wait time between images in the WACS web based slideshow - normally this defaults to 3 seconds (assuming the next image can be retrieved within that time period). This can be set to anything between immediate and ten seconds in a number of steps.
So what about the three image options? The first of these, image size, sets the size you would like the images reduced to for most effective display on your screen. The options currently offered by the pull-down selection are: 320x240 (mobile phone, data pad), 640x480, 800x600 and 1024x768. The second option, image scaling, controls when WACS uses reduced size images and when it uses the normal size ones; the choices you have are to keep all images at their original size, resize only for slideshows, resize for slide shows and set pages or always resize. The third option, image quality, has a similar or greater effect on the perceived speed than the size of the image and that is because of it's effect on bandwidth.
If you're accessing a personal WACS site remotely, chances are you'll be using it through the uplink side of an ADSL broadband link which means the speed will be nothing like as good as you experience on your home network. Once again, WACS has the ability to help with this by making the images smaller before sending them - it can both make them smaller in dimensions and file size - the options discussed above to reduce the dimensions play a very important part, but you can also tell WACS to reduce the detail in the picture completely separately from it's dimensional size. What are normally quite presentable looking pictures can often be sent with about a quarter of the detail of the original image; a just passable image but which still gives the basic idea can be a tenth of the original size. The quality option in the preferences sets the amount of this detail-reduction is performed when the image is resized. Note that the quality controls only work when the image is being resized anyway - if the image is sent at original size, it is also sent at original quantity.
Your own personal preferences and sensitivity to artifacts (unwanted abherations in the picture) will have to guide you as to what settings offer you the best combination of quality versus speed - try various values and see what you prefer. Changes made through the preferences system take effect at the next new image downloaded, ie almost immediately.